LibrinoUser Manual
From your first book to backups and optional connections.
This guide follows the names shown in the interface. Notion and AI integrations are optional; the core Library works on its own.
01
Introduction and installation
Librino is a Windows app that imports bibliographic details from a URL or ISBN and stores them on your PC with reading records and covers. You do not need Notion or an AI service to browse and edit the Library.
Librino supports x64 editions of Windows 10 version 2004 or later and Windows 11. Its interface uses Microsoft Edge WebView2 Runtime, which is included with Windows 11 and already installed on most Windows 10 devices.
Install from the distribution page
Install Librino from its Microsoft Store page. Use the distribution destination linked by TINMOON rather than an unofficial copy.
Open Librino
Launch Librino from the Start menu. If WebView2 Runtime is missing, a native Windows message appears. Review it and choose Yes to open Microsoft’s free official download page in your default browser.
Check the version
Open Help at the lower left. The current version appears under About Librino. Include this number when contacting support.
A quick noteLibrino never installs WebView2 Runtime without your action. After installing the Runtime, open Librino again.
02
Add your first book
Paste a print-book ISBN or a supported product URL into “URL or ISBN” at the top of the Library. Supported stores are Amazon, Kinokuniya, Rakuten Books, Yodobashi, Barnes & Noble, and Waterstones.
Paste a URL or ISBN
Paste it into the field and select Add. Hyphens in an ISBN are fine. Kindle-only product pages may not contain an ISBN and may not be addable.
Review the result
Retrieved title, author, publisher, publication date, and other details appear on the card. If some details are unavailable, the book stays in the Library so you can edit or refresh it later.
Choose whether to search for a cover
By default, adding a book opens a Google Images search in your browser. To disable this, turn off “Search for a cover image after adding” under Settings → Add books.
A quick noteBefore adding another copy, check whether a book with the same ISBN or product URL is already in the Library.
03
Find and organize books
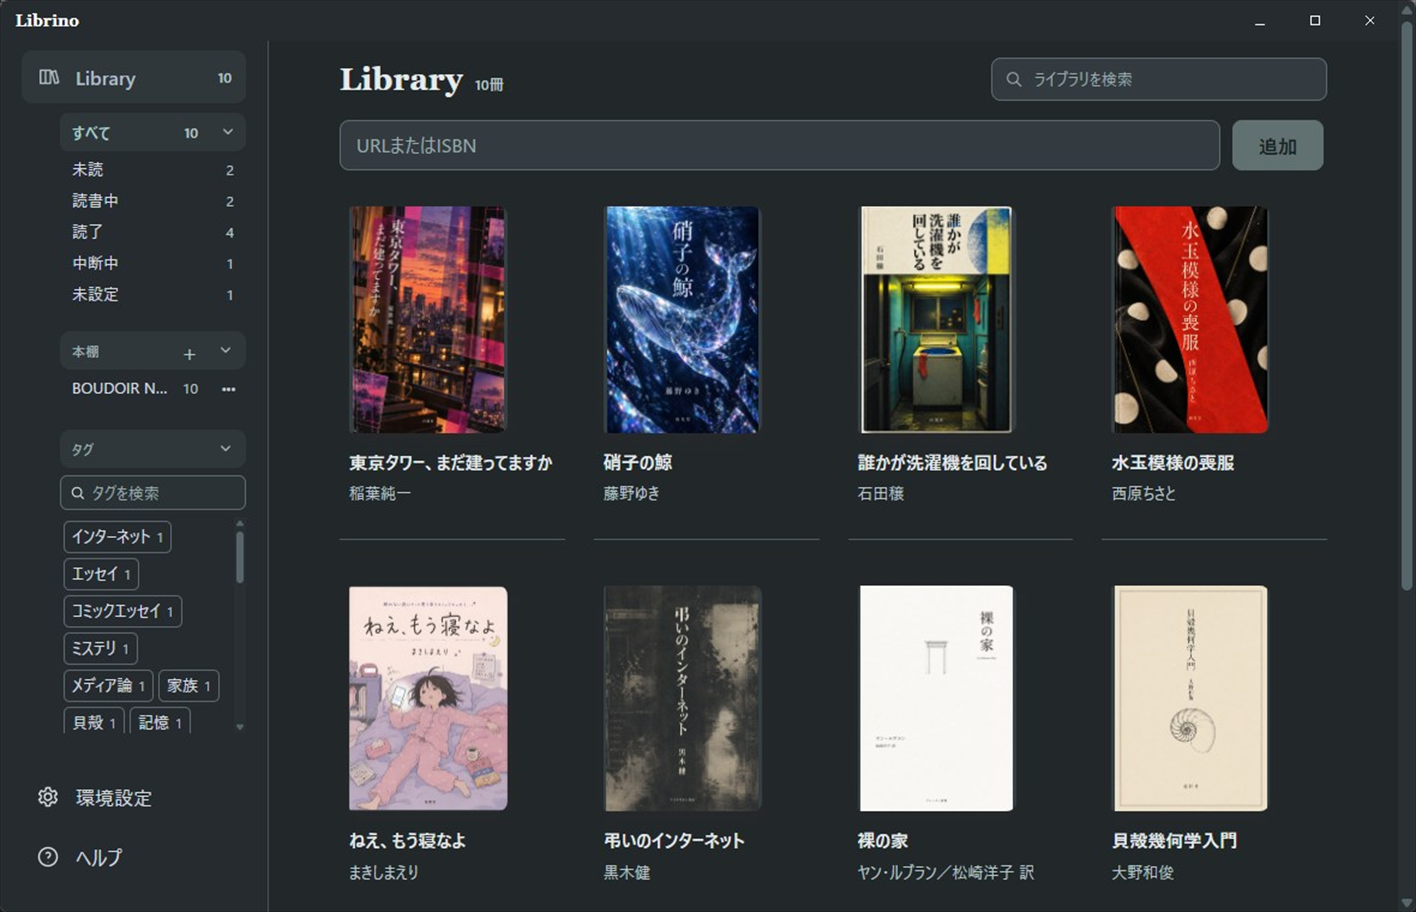
The sidebar lets you narrow the Library while keeping the counts visible. Search and categories can be used together.
- All: shows the current Library.
- Unread, Reading, Finished, Paused, and Not set: grouped automatically from each reading status.
- Bookshelves: create multiple shelves and place one book on more than one shelf.
- Tags: organize by your own terms, such as purchased, borrowed, reread, or work.
- Search: find books by title, author, or tag.
Create a bookshelf
Select the plus button beside Bookshelves in the sidebar and give it a name. On a book detail page, choose the shelves that should contain the book.
Add tags
Edit Tags on the book detail page. Saved tags appear in the sidebar and can be used to show related books together.
04
Edit book details and reading records
Select a cover or title to open the book detail page. You can choose which fields appear under Settings.
- Bibliographic details: title, author, publisher, publication date, and ISBN.
- Reading record: start date, finish date, status, rating from 1 to 5, and tags.
- Memo: free-form reading notes with line breaks.
- Bookshelves: the shelves containing the book.
Correct bibliographic details
Select Edit book details, review the current values, and change only what is needed.
Refresh bibliographic details
A refresh shows the difference between current and retrieved values before applying it. Existing cover art is kept, and content is not replaced without review.
Keep reading records and notes
Choose dates, status, rating, and tags. Use Edit memo for notes, then confirm the saved values on the detail page.
Delete a book
Select the trash button at the lower right and read the title and author in the confirmation dialog. The deleted book, reading record, and pasted cover cannot be restored from the current Library.
A quick noteDeleting a book affects the current Library only. Existing backups, exports, and Notion pages are not deleted automatically.
05
Add or change a cover
Use image search or paste an image you copied. Librino does not automatically republish an image from a bookstore page.
Search for an image
Select Search for cover on the detail page to open a Google Images search using terms such as title, author, and ISBN.
Copy an image you may use
Review the rights and terms for the image, then copy an image you are allowed to use to the clipboard.
Paste it into Librino
Right-click the cover on the detail page and choose Paste image. Confirm that the cover changes.
A quick noteThe user is responsible for checking copyright and usage terms for a selected image.
06
Backup, restore, and export
Open Settings at the lower left and find Data. Before a major change or restore, save a current ZIP backup somewhere safe.
Create a ZIP backup
Select Create backup and choose a destination. The Library, covers, and settings are stored in one ZIP. Review the book and cover counts shown on completion.
Restore from ZIP
Choose the ZIP to restore and review the displayed contents. Librino automatically saves the current Library before replacing it.
Export a list
Choose CSV, JSON, or Markdown and select Export. This creates a copy for a spreadsheet, program, or document; it is not synchronization.
A quick noteZIP, CSV, JSON, and Markdown files saved outside Librino are controlled by you. Manage or delete them separately when no longer needed.
07
Settings
Settings covers behavior after adding a book, detail-page fields, appearance, language, Notion, AI integration, and data protection.
- Add books: choose whether to open a cover-image search after adding.
- Detail page: choose Simple, Reading record, Book details, All, or individual fields.
- Appearance: choose Light, Dark, or System, and adjust the title-bar color.
- Language: choose Japanese or English.
- Send to Notion: choose whether to show the detail-page button and open the browser after a send.
A quick noteSystem follows the current Windows light or dark mode. Your theme and language remain selected after restarting Librino.
08
Send books to Notion
Notion integration is optional. It is not automatic synchronization: Librino sends data only when you start a transfer. Treat the local Librino Library as the source of truth.
Connect to Notion
Under Settings → Send to Notion, start the connection. In the browser, choose a regular Notion page as the destination and grant access.
Choose what to send
Choose one book, a bookshelf, or the whole Library, then decide whether to include memos and covers. Send to Notion on a detail page sends that book with its memo and cover.
Review the result
Check the counts for new and updated pages. A page with the same Librino Book ID is updated rather than duplicated.
Show covers in a gallery
Open Librino Library as a gallery in Notion. Open the database settings, choose Layout, set Card preview to Page cover, and turn on Fit image to keep the full cover visible.
Disconnect
Disconnecting removes the local Notion connection information. Pages already sent to Notion remain and must be managed or deleted in Notion.
09
Use your Library with AI (MCP)
Librino can provide local Library information to MCP-compatible apps such as Codex and Claude Code. Librino itself does not contain generative AI. The connected service is governed by its provider’s settings and policy.
Connect Codex
Under Settings → AI integration (MCP), use the Codex section to add or check the connection. Choose separately whether that connection may read and edit memo contents.
Connect Claude Code
Copy the connection information from the Claude Code section and follow the manual setup steps shown there. This registration is separate from Codex.
Reopen the AI app
After registration, restart the AI app or reopen the session. Begin by reading the Library summary or book list and checking the total count.
Read before changing
Before changing a reading record or memo, read the current book and revision and preserve the complete current record. Adding a book and refreshing details use a preview followed by confirmation.
A quick noteWith memo permission off, a connection can see that a memo exists but cannot receive its contents. Allow only the scope needed for each connection.
If AI cannot read your Library after a Librino update
A Librino update can disconnect the MCP connection used by your AI app. If waiting does not restore it, reconnect from the AI app.
Finish any work running in your AI app before reconnecting. Use either method below.
Method 1: restart the AI app
Fully quit the AI app, then open it again. Return to the same conversation and check whether it can read the Library count.
Method 2: restart connections while keeping Codex open
This restart may interrupt connections in your other Codex conversations. Finish work in those conversations first.
- Open Settings → Plugins → MCP in Codex.
- Stay on that screen. Turn off the server named "librino", wait a few seconds, then turn it on again.
- If a Restart icon appears near the Servers heading on the same screen, select it. Complete the restart before returning to the conversation; turning the server off and on alone may not restore the connection.
- After the restart finishes, return to the conversation and check whether it can read the Library count.
If Restart does not appear, or the connection still does not work, use Method 1.
Memo-sharing permission is separate from reconnection. You do not need to change memo permission to restore the connection.
Method 2 was checked on October 27, 2026 with Librino 1.0.1.0 and the Japanese interface of Codex 26.1021.3705.0 for Windows. Control names may differ by version or display language.
10
Troubleshooting and support
If the problem remains, email tinmoon.label@gmail.com with the Librino version, the action you took, and the message shown. A diagnostic log may contain an ISBN, so review it before sharing it publicly.
- WebView2 message at startup: confirm that the link is an official Microsoft page, install the Runtime, and reopen Librino.
- Book details are unavailable: check the URL or ISBN and the network, wait, then try Refresh book details. Existing values are protected from an empty result.
- Cover search does not open: check Settings → Add books and your default browser.
- Notion transfer fails: check the connection, destination page, and transfer scope. Send again after changes because there is no automatic sync.
- The AI app cannot see Librino: check that app’s connection settings and restart the app or reopen its session. Codex and Claude Code are registered separately.
- You are unsure about restoring: create a fresh backup first and review the book count and contents of the ZIP you plan to restore.
Cannot read the Library after an update? Go to the MCP reconnection steps.